Jupyter integration
Note
This guide is applicable if running JupyterLab >=2.x. If running older
versions or using other editors (such as VSCode or PyCharm), check out
the Other editors (VSCode, PyCharm, etc.) guide.
Ploomber integrates with Jupyter to make it easy to create multi-stage pipelines composed of small notebooks. Breaking down logic in multiple steps allows you to develop modularized pipelines that are easier to maintain and deploy.
Before executing scripts or notebooks, Ploomber injects a new cell that
replaces the upstream variable at the top of the notebook (which only
contains dependency names) with a dictionary that maps these names to their
corresponding output files to use as inputs in the current task.
For example if a Python script (task.py) declares the following dependency:
upstream = ['another-task']
And another-task has the following product definition:
tasks:
    - source: another-task.py
      product:
        nb: output/another-task.ipynb
        data: output/another-task.parquet
The following cell will be injected in task.py before execution:
# this is injected automatically
upstream = {'another_task': {'nb': 'output/another-task.ipynb',
                             'data': 'output/another-task.parquet'}}
The cell injection process happens during execution and development, allowing you to develop pipelines interactively.
Note
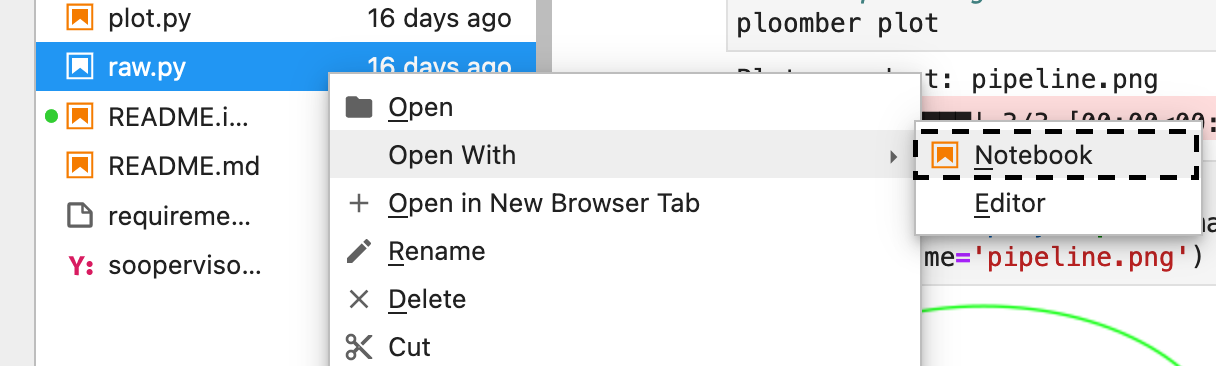
When using jupyter notebook, scripts automatically render as
notebooks. If using jupyter lab: Right-click -> Open With
-> Notebook as depicted below:
Note
If you want to configure JuptyerLab to open .py files as notebooks with a
single click, see the
corresponding section.
Important
Task-level and DAG-level hooks are not executed when opening scripts/notebooks in Jupyter.
Interactive development
You can develop entire pipelines without leaving Jupyter. The fastest way to get
started is to use the ploomber scaffold command, which creates a base
project, check out the guide to learn more: Scaffolding projects.
Once you have a pipeline.yaml file, you may add new tasks and run
ploomber scaffold again to create base scripts. For example, say you
create a pipeline.yaml like this:
tasks:
  - source: scripts/get.py
    product:
      nb: output/get.ipynb
      data: output/get.csv

  - source: scripts/clean.py
    product:
      nb: output/clean.ipynb
      data: output/clean.csv

  - source: scripts/fit.py
    product:
      nb: output/fit.ipynb
      model: output/model.pickle
Once you execute ploomber scaffold, you’ll see the three new scripts
under the scripts/ directory. You can then start adding the relationships
between tasks.
The upstream variable
Let’s say your scripts/clean.py script cleans some raw data. That means
you want to use the raw data as input (which is downloaded by
scripts/get.py), you can modify the upstream variable to establish this
execution dependency.
# ensure we get the data, and then we clean it
upstream = ['get']
To inject the cell, reload the file from disk:

Then, you’ll see something like this:
# injected cell
upstream = {'get': 'nb': 'output/clean.ipynb', 'data': 'output/clean.csv'}
Now you can continue developing your cleaning logic without hardcoding any
paths. Furthermore, when executing your pipeline, Ploomber will
run scripts/get.py and then scripts/clean.py
Important
Ploomber needs to parse your pipeline.yaml file to inject cells
in your scripts/notebooks; if an error happens during the parsing process, you
won’t see any injected cells. Check out
the Troubleshooting section below
for details.
Choosing the source format
Ploomber supports scripts and notebooks as source formats for tasks. We
recommend using .py files, but you can use the traditional .ipynb format
if you prefer so. As long as your file has a tag named parameters, it will
work fine (click here to learn how to add the parameters cell)
The advantage of using .py files is that they’re much easier to manage with
git, the disadvantage is that .py only contain code (not output), so after
editing your .py file, you need to run the task to create the executed
notebook (the one you declare as a product of the task).
However, if you want a more ipynb-like experience with .py files, you can
use jupytext’s pairing feature
to sync the output of a .py to a .ipynb file.
We rely on Jupytext for the .py to .ipynb conversion so that you can use
any of the .py flavors, here are some examples:
Light format
# + tags=["parameters"]
upstream = None
product = None

# +
# another cell
Percent format
# %% tags=["parameters"]
upstream = None
product = None

# %%
# another cell
Check out Jupytext documentation for more details on the supported formats.
Activating the Jupyter extension
Note
For tips on troubleshooting pipeline loading, see Troubleshooting pipeline loading.
In most cases, the extension configures when you install Ploomber; you can verify this by running:
jupyter serverextension list
If Ploomber appears in the list, it means it’s activated. If it doesn’t show up, you can manually activate it with:
jupyter serverextension enable ploomber
To disable it:
jupyter serverextension disable ploomber
Important
If you want to use the extension in a hosted environment
(JupyterHub, Domino, SageMaker, etc.), ensure Ploomber is installed
before JupyterLab spins up. Usually, hosted platforms allow you to write
a custom start script: add a pip install ploomber line, and you’ll be
ready to go. If you cannot get the extension to work, post a question
in the #ask-anything channel on
Slack. Alternatively, you may replicate
the extension’s functionality using the command line, check out the
this guide to learn more.
Custom Jupyter pipeline loading
When you start the Jupyter app (via the jupyter notebook/lab command), the
extension looks for a pipeline.yaml file in the current directory and
parent directories. If it finds one, it will load the pipeline and inject
the appropriate cell if the existing file is a task in the loaded pipeline.
If your pipeline spec has a different name, you can create a setup.cfg file
and indicate what file you want to load. Note that changing the
default affects both the command-line interface and the Jupyter plug-in.
[ploomber]
entry-point = path/to/pipeline.yaml
Note that paths are relative to the parent directory of setup.cfg.
Alternatively, you can set the ENTRY_POINT
environment variable. For example, to load a pipeline.serve.yaml:
export ENTRY_POINT=pipeline.serve.yaml
jupyter lab
Important
export ENTRY_POINT must be executed in the same process that spins up
JupyterLab. If you change it, you’ll need to start JupyterLab again
Note that ENTRY_POINT must be a file name and not a path. When you start
Jupyter, Ploomber will look for that file in the current and parent directories
until it finds one.
changelog
New in version 0.19.6: Support for switching entry point with a setup.cfg file
Troubleshooting pipeline loading
Note
For tips on activating the Jupyter extension, see Activating the Jupyter extension.
If a pipeline is not detected, the Jupyter notebook application will work
as expected, but no cell injection will happen. You can see if Ploomber could
not detect a pipeline by looking at the messages displayed after
initializing Jupyter (the terminal window where you executed the
jupyter notebook/lab command, you’ll see something like this:
[Ploomber] Skipping DAG initialization since there isn't a project root in the current or parent directories. Error message: {SOME_MESSAGE}
The message above means that Ploomber could not locate a pipeline.yaml file
to use for cell injection, take a look at the entire error message as it will
contain more details to help you fix the problem. A common mistake is not to
include a pipeline.yaml file in the same directory (or parent) of the script/notebook you’re editing.
If a pipeline.yaml is found but fails to initialize, the Jupyter console
will show another error message:
[Ploomber] An error occurred when trying to initialize the pipeline.
A common reason for this is an invalid pipeline.yaml file.
Note that even if your pipeline is missing or fails to initialize, Jupyter will start anyway, so ensure to take a look at the console if you experience problems.
Another common situation is ModuleNotFoundError errors. Jupyter must
parse your pipeline in the process that runs the Jupyter application itself.
If your pipeline contains dotted paths (e.g., tasks that are Python functions,
task hooks, task clients, etc.), loading the pipeline will fail if such dotted
paths are not importable. Scripts and notebooks are handled differently. Hence,
a pipeline whose tasks are all notebooks/scripts won’t have this issue.
If you cannot find the problem, you can move to a directory that stores any of the scripts that aren’t having the cell injected, start a Python session and run:
from ploomber import lazily_load_entry_point; lazily_load_entry_point()
lazily_load_entry_point is the function that Ploomber uses internally
to initialize your pipeline. Calling this function allows you to replicate
the same conditions when initializing your pipeline for cell injection.
Detecting changes
Ploomber parses your pipeline whenever you open a file to detect changes.
The parsing runtime depends on the number of tasks, and although it is
fast, it may slow down file loading in pipelines with lots of tasks. You can
turn off continuous parsing by setting jupyter_hot_reload (in the meta
section) option to False. You’ll have to restart Jupyter if you turn this
option off to detect changes.
Managing multiple pipelines
Jupyter can detect more than one pipeline in a single project. There are two ways to achieve this.
The first one is to create sibling folders, each one with its own
pipeline.yaml:
some-pipeline/
    pipeline.yaml
    some-script.py
another-pipeline/
    pipeline.yaml
    another-script.py
Since Ploomber looks for a pipeline.yaml file in the current directory
and parents, it will correctly find the appropriate file if you open
some-script.py or another-script.py (assuming they’re already declared
as tasks in their corresponding pipeline.yaml.
Important
If using Python functions as tasks, you must use different module names for each pipeline. Otherwise, the module imports first will be cached and used for the other pipeline. See the following example.
some-pipeline/
    pipeline.yaml
    some_tasks.py
another-pipeline/
    pipeline.yaml
    other_tasks.py
The second option is to keep a unique project root and name each pipeline differently:
pipeline.yaml
some-script.py
pipeline.another.yaml
another-script.py
In this case, Ploomber will load pipeline.yaml by default, but you can
switch this by setting the ENTRY_POINT variable to the other spec.
(e.g., pipeline.another.yaml). Note that the environment variable must be
a filename and not a path.
Exploratory Data Analysis
There are two ways to use Ploomber in Jupyter. The first one is by opening a
task file in Jupyter (i.e., the source file is listed in your pipeline.yaml
file.
Another way is to load your pipeline in Jupyter to interact with it. This second approach is best when you already have some tasks, and you want to explore their outputs to decide how to proceed with further analysis.
Say that you have a single task that loads the data:
tasks:
    - source: load.py
      product:
        nb: output/load.ipynb
        data: output/data.csv
If you want to explore the raw data to decide how to organize downstream tasks (i.e., for data cleaning). You can create a new notebook with the following code:
from ploomber.spec import DAGSpec

dag = DAGSpec.find().to_dag()
Note that this exploratory notebook is not part of your pipeline (i.e., it
doesn’t appear in the tasks section of your pipeline.yaml), it’s an
independent notebook that loads your pipeline declaration.
The dag variable is an object that contains your pipeline definition. If you
want to load your raw data:
import pandas as pd

df = pd.read_csv(dag['load'].product)
Using the dag object avoids hardcoded paths to keep notebooks clean.
There are other things you can do with the dag object. See the following
guide for more examples: Interactive sessions.
As your pipeline grows, exploring it from Jupyter helps you decide what tasks to build next and understand dependencies among tasks.
If you want to take a quick look at your pipeline, you may use
ploomber interact from a terminal to get the dag object.
Opening .py files as notebooks with a single click
It is now possible to open .py files as notebooks in JuptyerLab with a
single click (this requires jupytext>=1.13.2).
If using ploomber>=0.14.7, you can enable this with the following command:
ploomber nb --single-click
To disable:
ploomber nb --single-click-disable
If running earlier versions of Ploomber, you can enable this by changing the
default viewer for text notebooks. For instructions,
see jupytext’s documentation
(click on the triangle right before the With a click on the text file in JupyterLab section).